Temperature Control in Plastic Injection Molding
Temperature in the molding of Plastic and Rubber Products need a Digital Proportional Controller. Once set and Tuned it has good repeatability and ensures product quality.Terms in Process Control and Explanation
There are three Controls to be Adjusted to make a Proportional temperature Controller Perform Properly. This method has to be practiced and experience gained from it can be used to get very good and stable Control of the temperature or other process parameters.
Analog
PID control using OpAmps
1. Set Point. (SP) -
This is the Temperature at which you require the Heated area
to be. Here we have to remember it is better to control the
temperature of the metallic area closest to heater to avoid
thermal Cushions. In Rubber and Plastic Molding if you are
measuring the plastic temperature directly it may give rise to
oscillations and proper control may not be possible.
In Controlling the Temperature of Air or Water (Bad Conductors
of Heat) Forced Convection with Fans for Air or Stirrers for
Liquids can be used when Sensing temperature of the Liquid or
air directly. But in Plastic such things cant be done as it is
a semi-solid when heated hence. Control of Temperature of the
Metal Discharging Heat to the Plastic is most practical.
Oscillations are inevitable if the sensor is away from heater
or is in contact with a non-conductor of heat.

2. Process Value. (PV) -
This is the Temperature at the Tip of the sensor or the
material touching the tip of the sensor. In Non-Conductors of
Heat like plastic if we are monitoring plastic at a certain
point the temperature of the plastic will be very different at
various points depending on the Distance of the Heater from
that point due to thermal gradients.

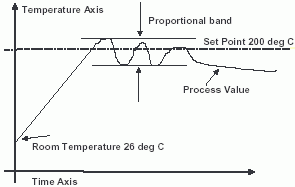
3. Proportional Band or Dead band. (PB) -
Dead band or H % or Hysteresis are terms used in on / off Controllers in proportional controller we use the term proportional band.
How
to Use Your PC to Measure Temperature
The Temperature zone in which the Controller turns on or off
The heaters in a time proportional manner is the proportional
Band. Set Point 200 deg C It is Given in % e.g. 10% PB of 200
deg SP is 20 deg. the Heaters are on till 190 deg C and off
above 210 deg. C. Between 190 to 210 is the PB. A little above
190 the Heaters are on for 90% time. A little below 210 Deg C
the Heaters are on for 10% of the time. When SP=PV Process
Value the Heaters are on for 50% of the time i.e. 50% Duty
Cycle.
4. Cycle Time -
This is the repetitive rate at which the heaters are Turned on or off Room Temperature 26 deg C For a Cycle time of 12 Seconds, when PV=SP heaters are on for 5 seconds and off for 5 seconds and this goes on as long as PV=SP.
Tuning or Adjusting a Proportional Temperature Controller
Step # 1 -
Ensure Sensor is properly connected to the Temperature
Controller TC polarity reversal will show reducing reading in
the Display as heat builds up. The Heaters used and wattage
selected must be able to bring the temperature more than the
maximum required control temperature with TC. If Supply
Voltage is down or heaters are blown or not in contact TC can
not solve the problem.
So when in doubt connect heaters directly to supply (without
TC) and see observe maximum temperature e. g. if max. temp. is
500 deg C the TC can control temperature upto 480 deg C.
Step # 2 -
Keep PB in minimum position and power on system e. g. set
temperature is 300 deg C. Now Observe maximum overshoot. and
adjust proportional band as in table below.
SP 300 deg C
PV (Process Value or Measured Temperature)
After each change turn on system again to see response till
2 % or less variation or overshoot or oscillations are
obtained.
Thumb Rule ! -
- Increment PB to Decrease Overshoot.
- Increment PB to Decrease Oscillations.
- Stop adjustment when PV droops < SP
- Adjust EC to match SP = PV after PV is stable at a point less than SP.
12-Bit,
4-20mA Loop-Powered System
Step # 3 -
There is an additional control called Error Cal EC ( manual reset or Integral) which is factory set for SP=PV 50% duty cycle. In certain cases after stable reading is obtained after adjusting or tuning PB the temperature may stabilize say at 290 deg for a set point of 300 deg the process is stable but a ten degrees process error is present. this can be compensated in two ways.
Increase setpoint to 310 deg the process settles at 300 deg
but this may not satisfactory even if it is practical.
Adjust Error Cal provided in the back panel to increase temperature to 300 deg from 290 deg.When this is done give some time for system to respond after every 1/2 a turn 180 deg of the control. the EC control is a Ten turn potentiometer like the SP potentiometer after 10 turns the direction of turning must change. Clockwise Increase temperature Anticlockwise decrease temperature. (at min. PB setting EC pot sets the On/Off Operating Point).
Temperature Control using SSR and STC1000PK

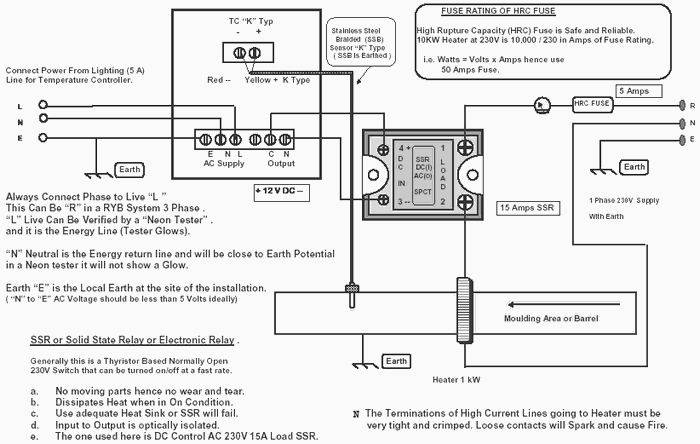
Mains Circuit -
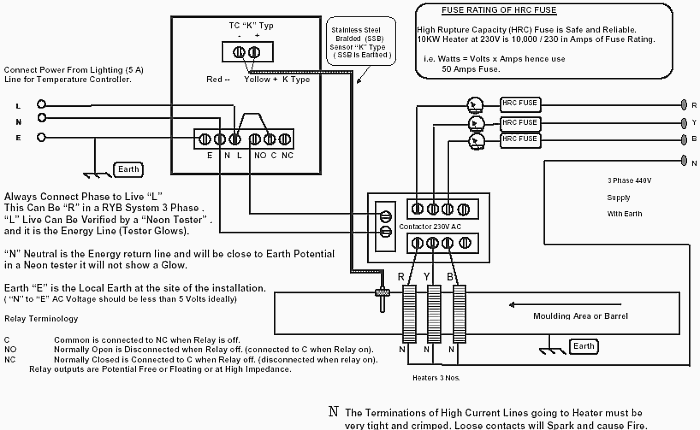
Always Connect Phase to Live "L ", This Can Be "R" in a RYB System 3 Phase . "L" Live Can Be Verified by a "Neon Tester" . and it is the Energy Line (Tester Glows). "N" Neutral is the Energy return line and will be close to Earth Potential in a Neon tester it will not show a Glow. Earth "E" is the Local Earth at the site of the installation. ( "N" to "E" AC Voltage should be less than 5 Volts ideally)
SSR or Solid State Relay or Electronic Relay -
Generally this is a Thyristor Based Normally Open 230V Switch that can be turned on/off at a fast rate.
- No moving parts hence no wear and tear.
- Dissipates Heat when in On Condition.
- Use adequate Heat Sink or SSR will fail.
- Input to Output is optically isolated. very tight and crimped.
- The one used here is DC Control AC 230V 15A Load SSR.
Components and Points -
- Connect Power From Lighting (5 A) for Controller.
- 1 Phase 230V Supply With Earth
- Stainless Steel Braided (SSB) Sensor "K" Type ( SSB is Earthed )
- Heater 1 kW and 15 Amps SSR
Fuse Rating of a HRC Fuse -
High Rupture Capacity (HRC) Fuse is Safe and Reliable. 10KW
Heater at 230V is 10,000 / 230 in Amps of Fuse Rating. i.e.
Watts = Volts x Amps hence use
50 Amps Fuse.
Relay Terminology -
- C Common is connected to NC when Relay is off.
- NO Normally Open is Disconnected when Relay off. (connected to C when Relay on).
- NC Normally Closed is Connected to C when Relay off. (disconnected when relay on).
Relay outputs are Potential Free or Floating or at High
Impedance.
Note - The Terminations of High Current Lines going to
Heater must be very tight and crimped. Loose contacts will
Spark and cause Fire.
Back to Process Control
Applications
...
...
...
...
...
delabs Technologies
30th Aug 2020
...
The documents, software, tools and links are provided to enhance the ability of an electronics student, hobbyist or professional by sharing information. The information, links etc. should be used by the website visitor, at his or her own risk and responsibility. There may be concept, design and link errors in the pages.
Creative Work, ideas and documents of delabs can be used for Product Design and Development by R&D Engineers, Hobbyists, Students and even firms for creating useful products. These cannot be used for reprint, replication or publishing online or offline.

