Sequential Timer Specs - doc00033
Description :
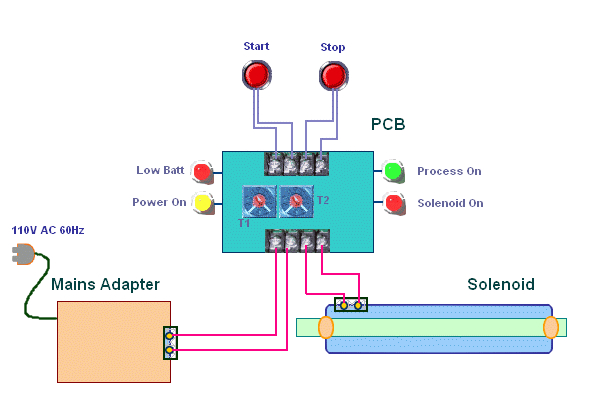
The circuit is a two stage sequential timer with auto reset. It can turn a Solenoid On/Off after a Sequence of delays that are preset. This is also a basic example of timer usage in automation.You can make very simple Timers with 555 also - Display On Timer with 555
Sequence Of Operation -
- Power on the Circuit.
- If Start switch is pressed.
- Then after Timer Delay T1 Secs the Solenoid Operates in Forward Direction.
- Next after Timer Delay T2 Secs the Power to Solenoid is cut off.
- Timers are Reset.
- Circuit Ready for next press.
All Timers are 1 - 30 Secs Analog with Presets to adjust with a screwdriver. The Switch, Solenoids and Power supply has to be via terminal blocks or plug-jacks. The PCB may be upto six Square Inches for standard DIP components but with SMD it may be smaller.

LED Annunciators -
SET 1
RED LED - indicates battery needs charging, battery is dead. will go off when battery has been charged.
YELLOW LED - indicates power is coming from adapter. will go off if mains supply is off or adapter is not plugged.
SET 2
GREEN LED - Indicates Start was pressed and process in on. will go off when the 2 timers are done - reset and cycle is complete.
RED LED - Indicates solenoid is on. will go off when solenoid is off.
The LEDs can be grouped in two sets on PCB or enclosure as specified. Specify if LEDs have to be on PCB to the PCB designer or ask him for a connector arrangement for remote panel LEDs.
Solenoid Specifications -
Volts - 12V, Current max - 500mA, surge - 1.2 Amps, coil - > 30 ohms. Type Push-Pull.
solenoid specs changed so as to make circuit smaller. There in no movement on reversal of polarity.
User End Inputs -
A provision for both START and STOP switches will be present, you can omit the STOP. Power supply to circuit : 18V - AC, 1.5 Amps, low voltage isolated, transformer or mains adapter. quality of transformer will determine product safety !
Battery - 14.4 volt 1000 mAH Prismatic Li-Ion Battery
Have a look at this Interesting Project which will develop your skill - Mikes Optical Timer Counter
Method of work :
- The Circuit will be sent to you after you approve this page of specs.
- The Circuit must be prototyped on breadboard at your end and tested.
- All troubleshooting help will be provided by email.
- You then need to make a PCB for the circuit and have it built by vendor.
- The circuit and technologies in the circuit will be open source.
Instructions :
The PCB has to be tested to conform with the circuit, this has to be Meticulous. The Circuit is for the Battery and Solenoid Specified and will have to be modified if battery and solenoid are different. D1 to D4 can be replaced by a 300V 3A Bridge Rectifier Module. F1 fuse could be 2A - 3A Slow Blow depends on Solenoid inrush current. Presets can be with some graduations if possible for ease of adjustments. LED resistors can be a bit lower if more brightness is required.Then try these modifications if you have problems. In del90005.pdf change C12 10pf to 68pf.
...
...
...
...
...
delabs Technologies
20th Mar 2020
...
Disclaimer and Terms of usage
The documents, software, tools and links are provided to enhance the ability of an electronics student, hobbyist or professional by sharing information. The information, links etc. should be used by the website visitor, at his or her own risk and responsibility. There may be concept, design and link errors in the pages.
Creative Work, ideas and documents of delabs can be used for Product Design and Development by R&D Engineers, Hobbyists, Students and even firms for creating useful products. These cannot be used for reprint, replication or publishing online or offline.

